Note
The Content Inspection with Automated Encryption tab is only available on an account that has the Advanced Managed Email Security license.
In Email Security > Content Inspection with Automated Encryption, you can select predefined policies for content inspection and add a keyword to bypass content inspection. You can also create your own custom content policies.
Custom content policies allow you to create specific rules so that certain emails will be encrypted. They are prioritized over predefined policies when it comes to assessing emails for encryption. This means that when an email is received by EncryptTitan to be assessed for encryption, a check is performed to see if Content Inspection with Automated Encryption is enabled. If it is, then the next check determines if custom content policies have been created and enabled. If so, custom content policies are applied for email encryption.
If there is no policy match, then the following checks are considered to determine if the email should be encrypted:
Is there an Outlook Plug-in or Add-in header?
Is there a keyword in the email subject?
Are there predefined content policies enabled for assessment?
For help creating custom content policies and selecting predefined content policies, go to Create Custom Content Policy and Select Predefined Content Policies respectively.
The custom content policies you create are listed in a table in Configurations > Email security > Content Inspection with Automated Encryption. The order of custom rules is taken top down in the table with the rule at the top being assessed first. If a match is found in an email, the mail will be encrypted based on that rule. If not, the next rule is assessed. You can set the priority order by selecting a rule and pressing the up/down arrow .

In addition to creating custom content policies, you can also:
Search: To search for a policy, enter part or all of the policy name in the search field and press Return. You can select Refresh at any time to update the data on the screen.
Edit: You can edit custom content policies as well as disable/enable them by selecting the checkbox beside the policy and selecting Edit. Follow the instructions below for assistance.
Delete: To delete a custom content policy, select the checkbox beside the policy and select Delete. You'll be prompted to confirm your decision in a pop-up message.
To create a custom content policy, follow these steps:
To enable Content Inspection with Automated Encryption, turn on the Enable toggle.

Go to Email Security > Content Inspection with Automated Encryption. In the Custom Content Policies section, select Add new.

In the screen that opens, complete the following fields:
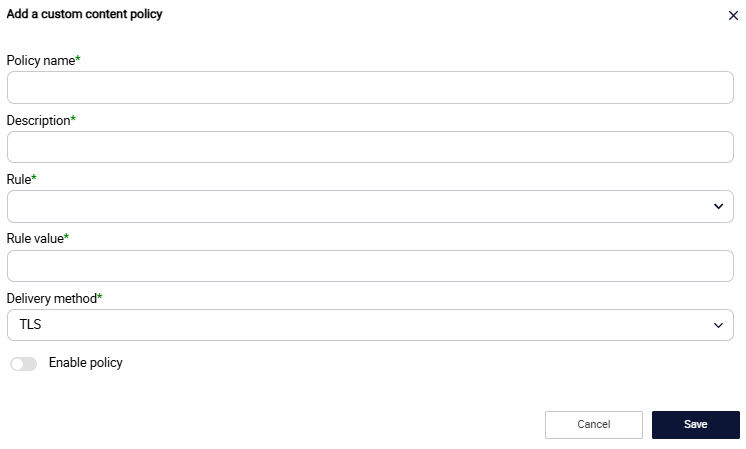
Policy Name: Enter the name of custom policy.
Description: Add a short description of the policy.
Rule: From the dropdown menu, select the rule that you want to apply.
Rule
Rule Value Required?
Rule Value
The sender is...
Yes
Enter a valid email address.
The sender address contains...
Yes
Enter:
Simple text, or
Regular Expression, that is, a prefix with REG.
The recipient is...
Yes
Enter a valid email address.
The recipient address contains...
Yes
Enter:
Simple text, or
Regular Expression, that is, a prefix with REG.
The subject contains...
Yes
Enter:
Text that you want searched in the subject line, or
Regular Expression, that is, a prefix with REG.
The body contains...
Yes
Enter:
Text that you want searched in the email body, or
Regular Expression, that is, a prefix with REG.
The body contains any credit card number...
Note
When this rule is added, the system will encrypt the email when the following two conditions are met:
RegEx matches the regular expression for credit card numbers (12 to 38 numbers).
Luhn algorithm checks the checksum of the credit card to make sure it is a valid credit card number.
No
N/A
The email contains one or more attachments...
No
N/A
Any email attachment filename contains...
Yes
Enter:
Text that you want searched in the attachment, or
Regular Expression, that is, a prefix with REG.
The email header contains...
Yes
Enter a key value pair to search for in headers such as From and Subject. The custom name and value can be any value as long as they are supported by email standard.
Rule value: Depending on the rule you selected, enter the value provided in the Rule Value column in the above table.
Delivery method: From the dropdown menu, select from the following:
TLS: Send emails with Transport Layer Security (TLS) protocol.
No Registration Required (NRR): An end user can send emails and have them delivered to a secure portal without the recipient having to set up an account on the secure portal.
Registration Required (RR): Recipients must be registered with EncryptTitan to receive encrypted email. Recipients of a mail sent with the RR keyword will have to set up an account on the secure portal to view their mail.
Enable Policy: Turn the toggle on to enable the policy.
Select Save.
If you are enabling the BIC/Swift Numbers or Netherlands Passport Numbers policies, be aware that these numbers require the appropriate context in order for encryption to be applied.
To search for a policy, enter part or all of the policy name in the search field and press Return. You can select Refresh at any time to update the data on the screen.
To enable Content Inspection with Automated Encryption, turn on the Enable toggle.
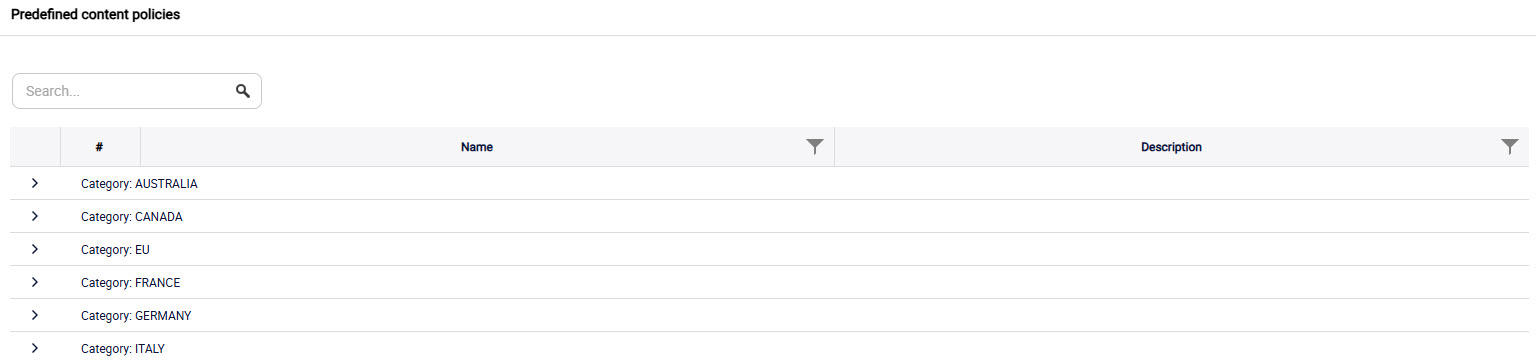
Go to Email Security > Content Inspection with Automated Encryption. In the Predefined Content Policies section, click on the arrow(s) to expand the predefined policies for each category. You can hover your mouse over the Description to read an explanation of every category. To see the policies listed in table format, go to Appendix A: Predefined Policies for Content Inspection.
Select the checkboxes beside the policy or policies that require email content assessment.
It is optional to create a subject line keyword to bypass content inspection.
If you want to create a subject line keyword that will bypass content inspection, go to the next step.
If you do not want to create a subject line keyword that will bypass content inspection, select Update.
To bypass the content inspection of emails, select the I want to create a subject line keyword that will bypass content inspection checkbox.

Select Add New. In the window that opens, enter the keyword. For an email to bypass content inspection, then the keyword created here must be added to the email subject. Select Save.
You can provide this keyword to any end user you want to have the ability to bypass content inspection.
Note
Be sure to enter a keyword that is different from the keywords mentioned in the Secure Delivery Method 01: TLS, Secure Delivery Method 02: No Registration Required (NRR) and Secure Delivery Method 03: Registration Required (RR).
Select Update.
Note
For Advanced Managed Email Security license, note the following:
If content inspection is enabled and an email has content that matches a policy that is enabled, then the email delivery method will be based on the secure delivery method enabled on the customer account.
If all three delivery methods are enabled [Secure Delivery Method 01: TLS; Secure Delivery Method 02: No Registration Required (NRR); and Secure Delivery Method 03: Registration Required (RR)] then TLS delivery will be attempted first. If TLS fails, then NRR delivery will be used.
If one or more keyword(s) are set up for email encryption and an email has one of the keywords in the subject line, then that email will be delivered using the specified delivery method. It will not be assessed for content inspection.
If there is no encryption keyword in the email subject line and content inspection is enabled, then the email will be assessed for content that matches the enabled policies. If a match is found, the email will be encrypted.